In WooCommerce stores, most customers like to omit the mandatory email address field and like it when it is optional.
But, forcing them to fill up their email details on irrelevant products (email address is not necessary for purchasing a shirt) may lead to site abandonment and thus lower our sales and conversion rates.
Also, removing the email address field (when it is needless) from our checkout page allows more flexibility for customers purchasing our products on the go.
This change does not affect your ability to receive support or sign up for additional product notifications.
Table of Contents
Why do we Remove Email Address Field from WooCommerce Checkout?
As I said, most customers wouldn’t like to provide their email addresses on the checkout page.
But, if we force them to fill up their email address mandatorily, the chances of abandonment are higher.
Ecommerce store sites like cloth, grocery, food, and other related product sites leave the email address field optional as they acquire enough with their customers’ phone numbers and addresses.
Imagine if a customer visits your site to buy a shirt and is satisfied with your product and price. Then, he adds that product to his cart and proceeds to the checkout.
On that page, he fills up the details for making the purchase. They mostly ignore the email address field. As they have already given their phone number, they feel that’s enough to track you for the product delivery or other activities.
I also recommend that if your product niches don’t want such fields, then make it optional.
Customize your WooCommerce Checkout Page
The checkout is the most important page as the customer could purchase the product successfully or abandon the site.
So, we should be more careful while designing our checkout page. Customize the checkout page relevant to our product niches.
Here’s an example,
The below-shown was the default checkout page of WooCommerce (An uncustomized page)

It contains more irrelevant fields for buying a shirt. Let’s say you are a customer and want to buy a shirt from a site.
Even if you feel enough about the product and price, you may neglect the page only because of the uncustomized checkout page.
Here, take a look at the customized checkout page.

The above page is customized based on the product needs with a suitable plugin.
It only contains the related fields for a shirt, such as the name, size, color, logo, phone, address, and date time picker fields.
In the sea of WordPress, numerous plugins are there to customize our checkout pages. We have to choose which one is suitable for our business types.
So, based on the features and pricing, we have picked the best checkout field editor and manager for the WooCommerce plugins. They suit mostly all Ecommerce stores. So, have a look!
Here, I’ve explained one of the best checkout field editor plugins to serve what you want.
Checkout Field Editor and Manager for WooCommerce

Customize your WooCommerce checkout pages effortlessly with the Checkout field editor and manager plugin. It helps you add, edit, remove, and modify the custom and default checkout fields.
Edit the billing, shipping, and order sections for your flexibility. Create custom sections and position them based on your business niche.
Provide relevant fields to ease the work of your customers
It serves you 17+ custom checkout fields to capture additional information from your customers.
Custom Checkout Fields
- Text
- Telephone
- State
- Country
- Color Picker
- Date Picker
- Time Picker
- DateTimePicker
- Number
- TextArea
- Select
- Checkbox
- Radio Buttons
- Paragraph
- Header
- File Upload
Key Features
- Create and place custom sections
- Reposition the fields
- Automatic field validation
- Easy section positioning
- More customizable options
- Simple checkout optimizations
- Additional CSS classes
- WPML compatibility
- Compatible with the majority of WordPress themes
- Help text feature
- Drag and drop form builder
- Lightweight and easy to use
How to Remove Email Address Field from WooCommerce Checkout?
After activating the checkout field editor and manager for the WooCommerce plugin, follow the below three simple steps.
They help you remove the unwanted fields (here, that was the email address field) from your WooCommerce checkout.
Step 1: Plugin Dashboard
First, go to the WooCommerce >> Checkout Field Editor. The dashboard page of the plugin opens on your screen.
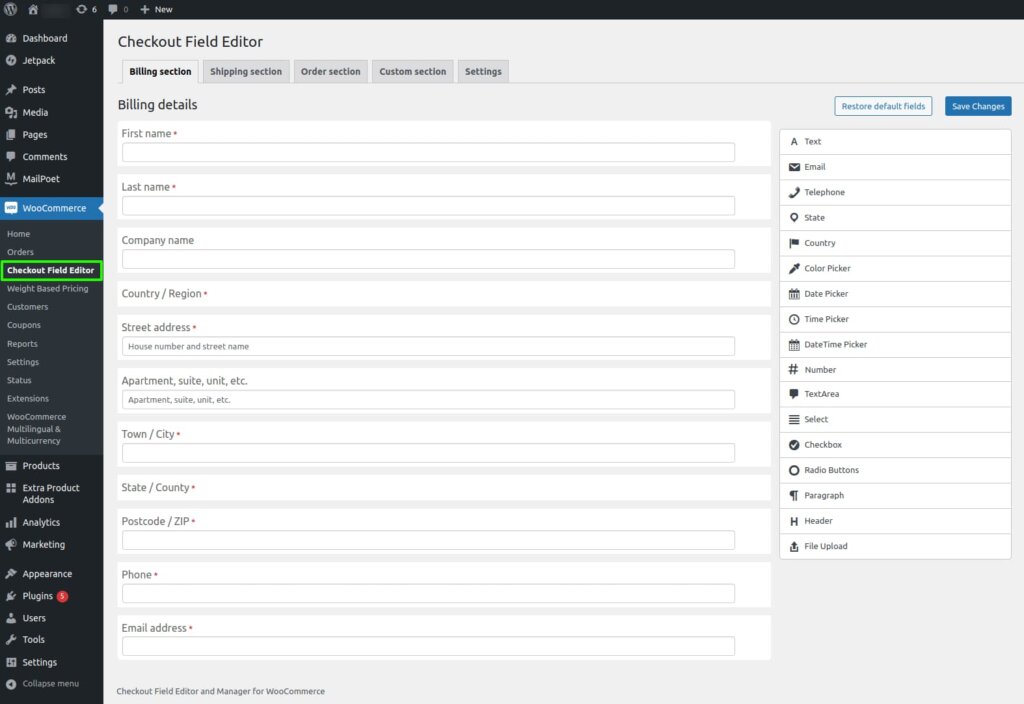
There you can see the default checkout fields arranged in their order. In the default WooCommerce, you’re not allowed to edit the checkout fields based on your business niche.
But, with this, you can edit whatever you want.
Step 2: Remove the Email Field
If you want to remove the email address field, then hover the mouse over the top right portion of that field. You can see three options there.
1 – Remove
2 – Edit
3 – Copy

Click the first option (Remove) to delete that field. Likewise, you can edit the checkout field based on your business niche.
Step 3: Save the Changes
Finally, click the Save Changes button on the top right portion of the page. That’s it. You have now removed the default email address field from your WooCommerce checkout page.

Also, click the Restore default fields button to restore all the fields as in the default WooCommerce.
Conclusion
In this article, we’ve seen how customers give importance to the default and customized checkout pages. And the steps to remove the email address field from the default WooCommerce checkout page.
Also, know more about the Customization of the WooCommerce Checkout Pages.