The article will show you how to add the custom fields to billing and shipping addresses on your Woocommerce checkout in a few steps.
The billing and shipping address section plays a crucial role in your WooCommerce checkout. They are the real heroes of the checkout process.
Also, it is the last chance to urge a customer to make a purchase.
So, you need to improve and customize the checkout page to increase the sales and conversion rates.
Come, let’s take a look at that!
The page should be attractive and more flexible to access for our customers. So, we should be aware while customizing the checkout page.
Table of Contents
What is the Importance of the Billing & Shipping Address Section?

For any WooCommerce store, the customers should provide their billing address during the purchase. Also, there is an additional option for the shipping address from where they receive the product (the delivery location).
The default Checkout fields work well for some users. But for most of us, we need changes like making a particular field required, changing the order of the fields, adding some custom checkout fields to acquire more information from our customers, and some others.
For that, we have to find ways to add some extra custom fields on your WooCommerce checkout.
Ways to Add Custom Checkout Fields
Two ways are there to add custom fields to our WooCommerce checkout. One, by using the appropriate plugin to do it. Another is, using custom codes.
Here, we use the plugin method to minimize our work.
I select this way as we don’t need to learn any code to access that. So, there is no need for any coding knowledge required to work in this method.
We want a plugin that serves more flexibility and enhanced features to design our checkout page based on our needs, right?
So, we have handpicked the best plugin with many rich features and an affordable price range.
Checkout Field Editor & Manager for WooCommerce

Customize your WooCommerce checkout pages more flexibly and based on your business needs. The Checkout field editor and manager provide 17+ custom checkout fields to capture more from your customers.
Add, edit, delete, and modify the checkout fields in the billing and shipping sections. You can create custom sections and position them where you want on the checkout.
Custom Checkout Fields
- Text
- Telephone
- State
- Country
- Color Picker
- Date Picker
- Time Picker
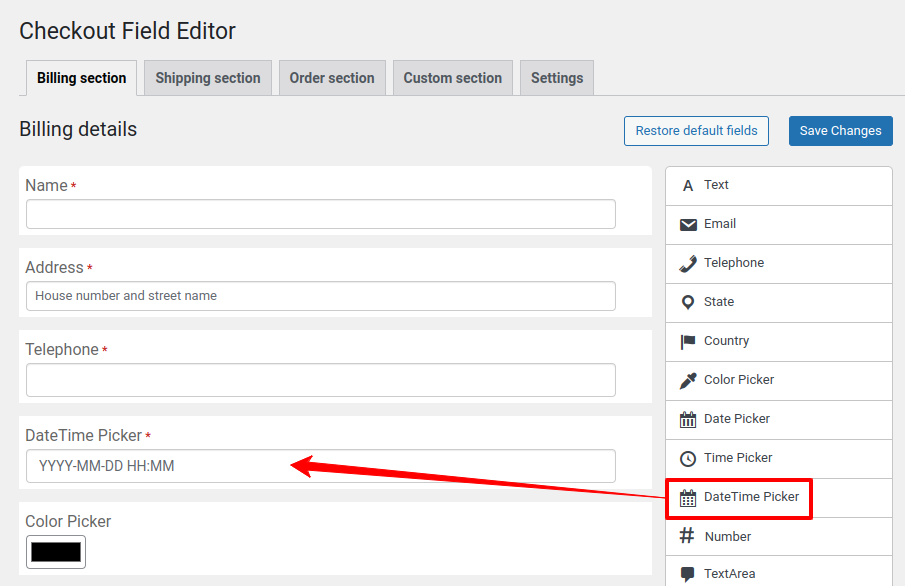
- DateTimePicker
- Number
- TextArea
- Select
- Checkbox
- Radio Buttons
- Paragraph
- Header
- File Upload
Checkout Field Options
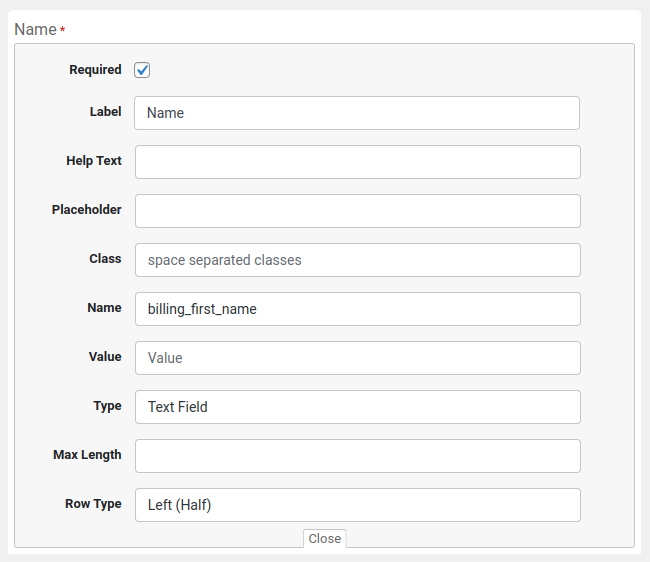
- Required – Make a specific field to fill mandatorily
- Label – Change the Label (Name) of the field
- Help Text – Place text to help customers understand what the field type is
- Placeholder – Display a short hint in the input field before the user enters a value
- Class – Add a space-separated list of CSS classes to the input element
- Name – Provide a unique name for the field type & no two fields have the same name (no need to edit)
- Value – Set a default value for the field
- Type – Put the text based on the type of field you need
- Max Length – Specifies the maximum number of characters allowed to enter the field
- Row Type – Decides the size of the respective field type (such as half left, half right, address)
Some Key Features
- Automatic field validation
- Easy section positioning
- Create & place the custom sections
- Easily customizable options
- Simple checkout optimizations
- Additional CSS classes
- Custom validations
- Drag & drop form builder
- Lightweight & easy-to-use
You’ll get a year of support & licenses for Free!
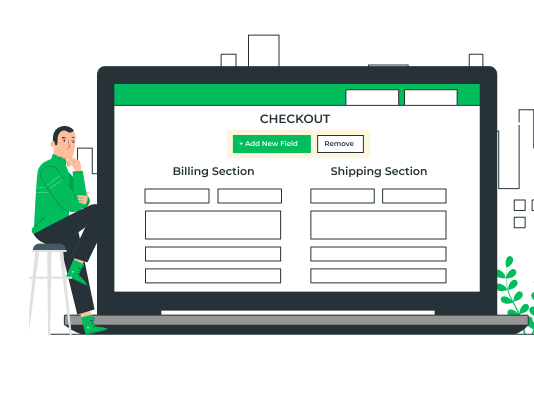
Steps to Add Custom Fields to WooCommerce Billing & Shipping Addresses
After activating the Checkout Field Editor and Manager for the WooCommerce plugin, follow the below-given procedures to create custom fields on the billing and shipping addresses in WooCommerce.
Step 1: Plugin Dashboard
On your WordPress dashboard, go to WooCommerce >> Checkout Field Editor. Then, the dashboard will display in your window. On the right side, you can see the custom fields.
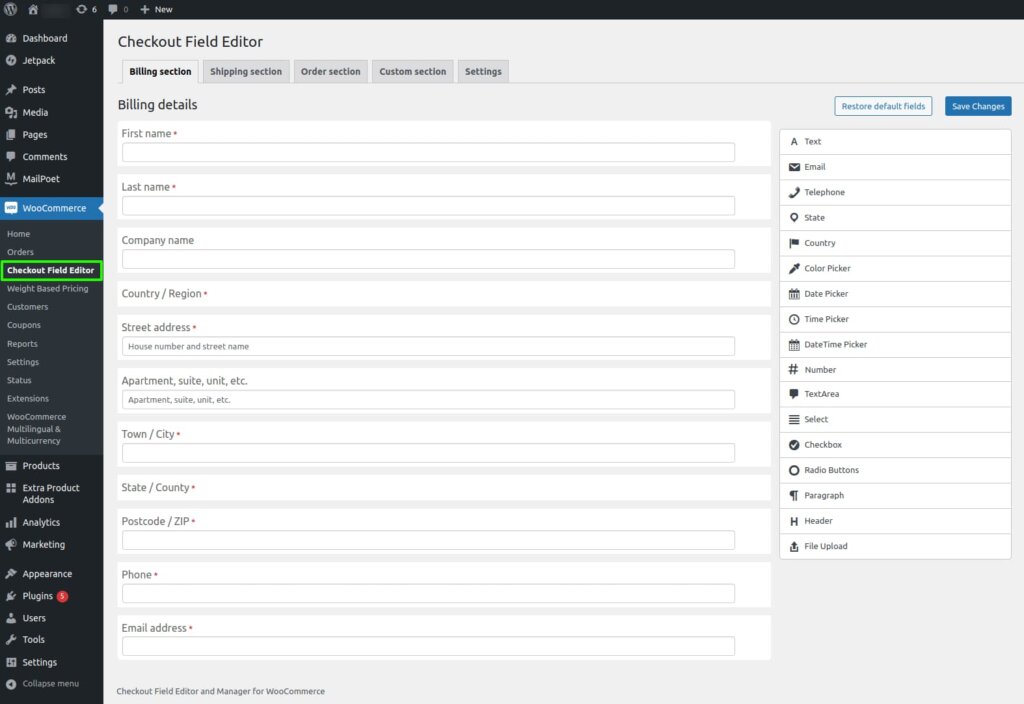
Step 2: Drag and Drop the Custom Checkout Field
Simply drag and drop a custom field (the field you want) from the field section to the checkout form. And position that field based on your needs.
Step 3: Edit the Custom Checkout Field
You can edit the label, placeholder, and others on a particular field (both custom and default) based on your business needs. I mentioned it in the field options above.
Step 4: Save the Created Field
Finally, click the Save Changes button. Then, visit your site’s front end to see the changes.

Conclusion
That’s it. You have now got the idea of how to add a custom field to your WooCommerce checkout simply without any coding knowledge. The same procedure will apply to creating custom fields in the shipping section.
Must provide relevant fields in your WooCommerce checkout to ease your customers.
Also, Customize your Checkout Pages to gain more.